The NSX-T logical load balancer offers:-
- high-availability service for applications and
- distributes the network traffic load among multiple servers.
The load balancer distributes incoming service requests evenly among multiple servers in such a way that the load distribution is transparent to users. Load balancing helps in achieving optimal resource utilization, maximizing throughput, minimizing response time, and avoiding overload.
You can map a virtual IP address to a set of pool servers for load balancing. The load balancer accepts TCP, UDP, HTTP, or HTTPS requests on the virtual IP address and decides which pool server to use.
Depending on your environment needs, you can scale the load balancer performance by increasing the existing virtual servers and pool members to handle heavy network traffic load.
Note:
- Logical load balancer is supported only on the Tier-1 logical router.
- One load balancer can be attached only to a Tier-1 logical router.
Load Balancing Topologies In-Line
 |
| Image Source: VMware Docs |
One-Arm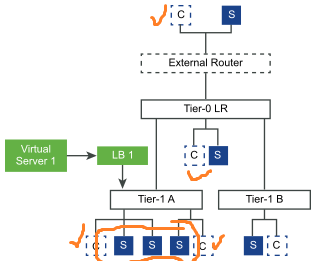 |
| Image Source: VMware Docs |
NSX-T Load Balancer Features- Layer 7 - HTTP and HTTPS with load balancer rules support
- Server pools - static and dynamic with NSGroup
- Persistence - Source-IP and Cookie persistence mode
- Health check monitors - Active monitor which includes HTTP, HTPPS, TCP, UDP, and ICMP, and passive monitor
- SNAT - Transparent, Automap, and IP List
NSX-T Load Balancer Maximums1. LB per NSX Edge

2. Max. Number of Virtual Servers and Pool Members Per LB
 Configuring Load Balancer
 In this scenario we have two web servers behind Load Balancer. These two servers are going to be the part of one server pool and i have another sorry server pool with web server to display sorry message.
1.
Create Server PoolServer pool consists of one or more servers that are configured and running the same application. A single pool can be associated to both Layer 4 and Layer 7 virtual servers.
Prerequisites- If you use dynamic pool members, a NSGroup must be configured.
- Depending on the monitoring you use, verify that active or passive health monitors are configured.
Load Balancing > Server Pools > Server Pools > Add > Click on Next
Choose One of the Load Balancing Algorithm
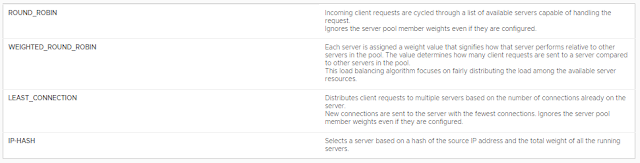 |
| Source: VMware Docs |

Configure the SNAT Translation > Next


Add Pool Members > Next
Membership Type can be

Select Active Health Monitor > Finish

2. Create Virtual Servers
Load Balancing > Virtual Servers > Virtual Servers > Add > Next

Configure VIP and Port Number > Next

Select Server Pool Created in Previous Step > Next

Click on Finish

3. Create Load Balancer
Load Balancing > Load Balancers > Load Balancer > Ok

Attach Load Balancer to a Virtual Server
Select Load Balancer > Actions > Attach to a Virtual Server

Attach Load Balancer to Tier-1 Logical Router

4. Configure Route Advertisement for LB VIP Routes on Tier-1 Router

5. Configure Route Redistribution For LB VIP Routes on Tier-0 Router

Now test the connectivity of these servers by using LB VIP (192.168.100.7)
If you want Sorry Server Configuration, Create Server Pool for Sorry Servers and Bind them Virtual Server Configuration.

 http://feedproxy.google.com/~r/Virtualization24x7/~3/RR84aLcRvPI/nsx-t-22-logical-load-balancer.html


