How do i add worker nodes to an aws eks cluster?
-
After creating your aws eks cluster: https://www.lightnetics.com/post/10410
You are going to need worker nodes to run your application.
This demo to create worker is taken directly from the AWS getting started guide for AWS EKS: https://docs.aws.amazon.com/eks/latest/userguide/getting-started.html, the getting started guide uses a cloudformation template create the worker nodes.
Now that your VPC and Kubernetes control plane are created, you can launch and configure your worker nodes.
Important
Amazon EKS worker nodes are standard Amazon EC2 instances, and you are billed for them based on normal Amazon EC2 On-Demand Instance prices. For more information, see Amazon EC2 Pricing.
To launch your worker nodesOpen the AWS CloudFormation console at https://console.aws.amazon.com/cloudformation.
From the navigation bar, select a Region that supports Amazon EKS.
Note
Amazon EKS is available in the following Regions at this time:
US West (Oregon) (us-west-2)
US East (N. Virginia) (us-east-1)
Choose Create stack.For Choose a template, select Specify an Amazon S3 template URL.
Paste the following URL into the text area and choose Next:
https://amazon-eks.s3-us-west-2.amazonaws.com/1.10.3/2018-06-05/amazon-eks-nodegroup.yaml
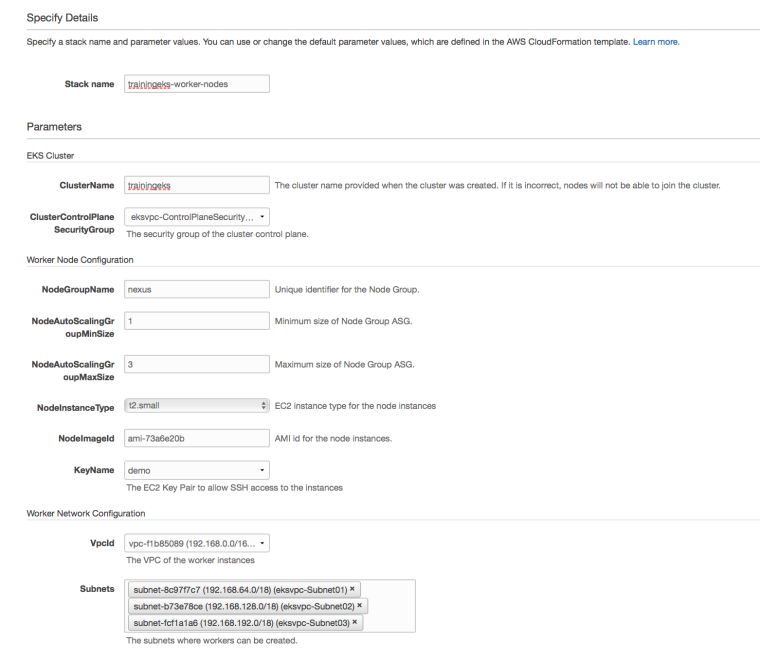
On the Specify Details page, fill out the following parameters accordingly, and choose Next.
Stack name: Choose a stack name for your AWS CloudFormation stack. For example, you can call it <cluster-name>-worker-nodes.
ClusterName: Enter the name that you used when you created your Amazon EKS cluster.
Important
This name must exactly match the name you used in Step 1: Create Your Amazon EKS Cluster; otherwise, your worker nodes cannot join the cluster.ClusterControlPlaneSecurityGroup: Choose the SecurityGroups value from the AWS CloudFormation output that you generated with Create your Amazon EKS Cluster VPC.
NodeGroupName: Enter a name for your node group that is included in your Auto Scaling node group name.
NodeAutoScalingGroupMinSize: Enter the minimum number of nodes that your worker node Auto Scaling group can scale in to.
NodeAutoScalingGroupMaxSize: Enter the maximum number of nodes that your worker node Auto Scaling group can scale out to.
NodeInstanceType: Choose an instance type for your worker nodes.
NodeImageId: Enter the current Amazon EKS worker node AMI ID for your Region.
Region Amazon EKS-optimized AMI ID
US West (Oregon) (us-west-2) ami-73a6e20b
US East (N. Virginia) (us-east-1) ami-dea4d5a1
NoteThe Amazon EKS worker node AMI is based on Amazon Linux 2. You can track security or privacy events for Amazon Linux 2 at the Amazon Linux Security Center or subscribe to the associated RSS feed. Security and privacy events include an overview of the issue, what packages are affected, and how to update your instances to correct the issue.
KeyName: Enter the name of an Amazon EC2 SSH key pair that you can use to connect using SSH into your worker nodes with after they launch.
VpcId: Enter the ID for the VPC that you created in Create your Amazon EKS Cluster VPC.
Subnets: Choose the subnets that you created in Create your Amazon EKS Cluster VPC.
Click the image to see it clearer.
On the Options page, you can choose to tag your stack resources. Choose Next.
On the Review page, review your information, acknowledge that the stack might create IAM resources, and then choose Create.
When your stack has finished creating, select it in the console and choose the Outputs tab.
Record the NodeInstanceRole for the node group that was created. You need this when you configure your Amazon EKS worker nodes.
Next Step: https://www.lightnetics.com/post/10413

© Lightnetics 2024